Anne Hathaway - 2015
Pipeline -

Inspiration
When I was watching movie, The Devil wears Prada, I enjoyed Anne Hathaway's character. This was my first human head sculpture, and I'm happy with how it turned out.
Process
First(Research), I gathered refrence images of her to study the facial features.
Second(Likeness Check),
I sculpted the main features of her head so it started to look like her.
I changed lighting frequently to see the form of the head.
Problem :
Most images of her head have different proportion that are caused
by camera lenses which made her look different in each one.
Solution :
I picked only one image to be the 'master' image, one image that
I would use to determine proportions, while other pictures
would be suplimentary.
Third(Finalizing the form), (experimenting with shaders)
After blocking in the base form, I finalized the form to move to
Texture process.
I have experimented with Skin, Eyes, hair, and Water shaders
to make proper texture for the shaders.
I created Base Color, Displacement, Specular, and SSS maps in Mari
Problem :
1. I had difficulty making a detailed specular shader that supported
a realistic face sculpt.
2. Too complicated SSS shader.
Solution :
1. I increased the render size to capture small details, like her pores.
I made two specular shaders. one for large area specular (Blinn),
the other one for small area specular(Phong) to emphasis details
on her face.
2. I applied SSS shader to a simple material to define which one
does what. At the same time, I read SSS shader document to
understand how it works.
Based on that, I created SSS map in Mari. I pluged in a Contrast
node into the SSS map in Maya to experiment with rendering
faster.
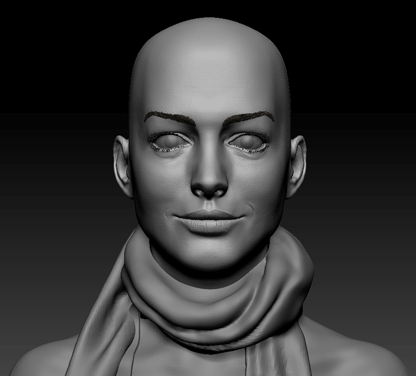
Zbrush Screenshot
Eye structure

Click images below to see large image
Shader nodes
Vray prototype


Normal map focused on face
Fourth(Hair)
I separated out the sections of the head to create portions of hair and have them under my control.
I used Zbrush Fiber mesh to flesh out the hair and took the Hair splines into Maya to utilize nHair
to create her new hair.
The reason I used nHair was that I had more control over small details.
For the Eye lashes and eyebrows, I used GMH Hair plugin.
Fifth(Lighting & Rendering)
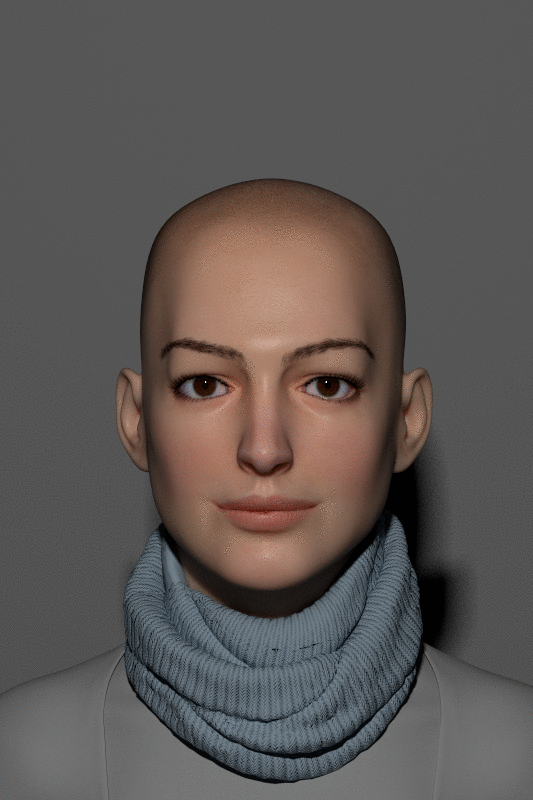
The theme of the location was she is posing on the
Red carpet.
I set up one single light directly facing her face as if
it is a camera flash.
Over all I learned much from this project. I enjoyed overcoming
the challenges this project presented, as well how art and
technology came together to form the end result.


Lighting setup
Hair Render
Vray Rendered Image
Photoshop adjusted
Texture maps


Software Used :


